FileChannel
Java는 NIO기반의 입출력 시스템에서 파일 읽기/쓰기를 위한 FileChannel을 제공한다. FileChannel은 기본적으로 동기화 처리가 되어 있어 멀티 스레드 환경에서 사용해도 안전하다.
FileChannel의 생성과 종료
FileChannel은 자신의 정적 메소드인 open()으로 FileChannel 객체를 생성할 수 있다. 또한 FileInputStream/FileOutputStream의 getChannel 메서드를 통해서도 얻을 수 있다.
FileChannel fileChannel = FileChannel.open(Path path, OpenOption option1, OpenOption option2, ...)open() 메서드는 매게인자로 파일의 경로 객체와 OpenOption이 필요하다. OpenOption은 StandardOpenOption의 열거 상수 중 필요한 것을 넣어주면 된다.
| Enum Constants | detail |
| READ | 파일을 읽기용으로 연다. |
| WRITE | 파일을 쓰기용으로 연다. |
| CREATE | 파일이 없다면 파일을 생성한다. |
| CREATE_NEW | 파일을 생성하며, 이미 존재하는 파일의 경우 예외를 발생시킨다. |
| APPEND | 파일 끝에 데이터를 추가한다. |
| DELETE_ON_CLOSE | 채널을 종료하면서 파일을 삭제한다. |
| TRUNCATE_EXSITING | 파일을 0바이트로 잘라낸다. |
FileChannel fileChannel = FileChannel.open(

    "C:/temp/file.txt",
    StandardOpenOption.CREATE,
    StandardOpenOption.WRITE
);
파일 쓰기(write)와 읽기(read)
파일을 쓰기 위해서는 FileChannel의 write() 메서드를 호출하면 된다. 이때 매개인자로는 ByteBuffer 객체를 넣어준다. 이때 ByteBuffer에 설정된 position부터 limit 전까지만 파일에 쓴다. write()는 쓰여진 총 바이트 수를 리턴한다.
int byteCnt = fileChannel.write(byteBuffer);
파일을 읽기 위해서는 FileChannel의 read() 메서드를 호출하면 된다. 이때 매개인자로는 ByteBuffer 객체를 넣어준다. 이때 파일에서 읽어진 데이터는 ByteBuffer의 position 위치부터 저장된다. read()는 파일에서 읽은 총 바이트 수를 리턴한다. 또한 만약 파일에서 읽은 데이터가 없다면 -1을 리턴한다.
int byteCnt = fileChannel.read(byteBuffer);
파일 복사 예제
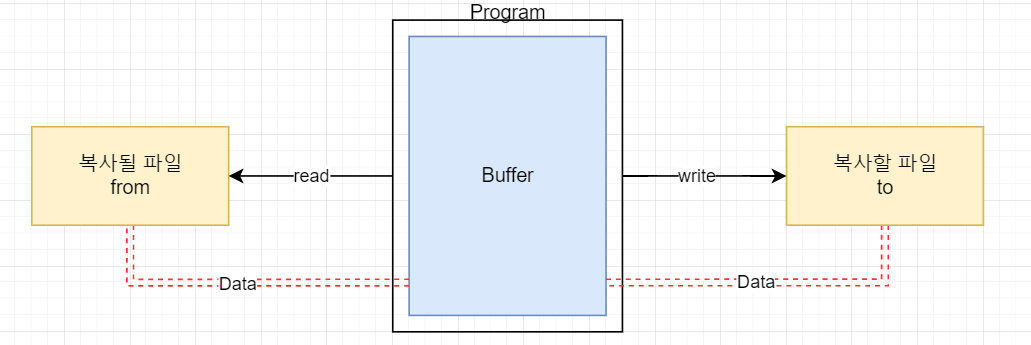
파일을 복사하기 위해 복사할 파일과 복사될 파일이 함께 사용하는 공용버퍼를 만든다. 그후 복사될 파일을 버퍼가 read한다음 다시 버퍼가 복사할 파일에 write하면 복사가 완료된다.
package com.itsjava.chap19;

import java.io.IOException;
import java.nio.ByteBuffer;
import java.nio.channels.FileChannel;
import java.nio.charset.Charset;
import java.nio.file.Path;
import java.nio.file.Paths;
import java.nio.file.StandardOpenOption;

public class FileCopyExample {
    public static void main(String[] args) throws IOException {
        Path from = Paths.get("C:/Users/USER/desktop/logo.png");
        Path to = Paths.get("C:/Users/USER/desktop/logo-copy.png");

        FileChannel fileChannel_from = FileChannel.open(
                from, StandardOpenOption.READ
        );

        FileChannel fileChannel_to = FileChannel.open(
                to, StandardOpenOption.CREATE, StandardOpenOption.WRITE
        );

        ByteBuffer byteBuffer = ByteBuffer.allocate(10000);
        int byteCnt;

        while (true) {
            byteBuffer.clear();
            byteCnt = fileChannel_from.read(byteBuffer);
            if (byteCnt == -1) break;
            byteBuffer.flip();
            fileChannel_to.write(byteBuffer);
        }

        fileChannel_from.close();
        fileChannel_to.close();

        System.out.println("file copy finished");

    }
}
while 블럭 내부를 보면 fileChannel_from을 통해 복사될 파일의 데이터를 읽어 byteBuffer에 넣는다. 이때 byteBuffer의 포지션은 읽은 데이터의 끝에 위치해 있다. (정확히는 데이터의 끝에서 1 더한 위치) 그렇기 때문에 buffer.flip()을 통해 position의 위치를 데이터의 시작위치로 옮겨 놓은 다음 fileChannel_to를 통해 복사할 위치에 데이터를 쓴다.
'Java > Network' 카테고리의 다른 글
| 8편 : TCP 소켓통신을 통한 멀티플레이 기능 구현 - 클라이언트 구현 (0) | 2022.01.23 |
|---|---|
| [Java] NIO 기반 네트워킹 : TCP 넌블로킹(non-blocking) 채널 (0) | 2022.01.18 |
| [Java] NIO 기반 입출력 : 파일 비동기 채널 (0) | 2022.01.15 |
| [Java] 네트워크(Networking) : TCP 통신 (0) | 2022.01.04 |

